Thailand Visa and Entry Guide: What Happens When You Land (2026 update)
Entering Thailand used to be simple: fill in a paper card, get a 60-day stamp, and go. That version of the process is gone. In the last eighteen months Thai immigration has retired the old arrival card, rolled out biometric e-gates, cut the standard visa-exempt stay from 60 days down to 30, and turned a decades-old cash rule into an active enforcement tool against serial visa-runners.
None of this is complicated once you know what’s changed. But every month I see the same first-timers get caught out at Suvarnabhumi because they’re working from a five-year-old blog post or something a mate told them in a bar. This guide reflects the rules as they stand from 15 September 2026, and it’s structured the way you’ll actually use it: figure out which entry path suits your trip, sort your paperwork before you fly, and know exactly what to expect at the counter.
1. Exemption vs. tourist eVisa: the 30-day decision tree
First, get the terminology straight, because these three things get mixed up constantly and they are not the same:
- Visa exemption: free and automatic, stamped on arrival if you hold a passport from an eligible country. No application, no fee, no advance paperwork beyond the TDAC (see Section 2). It is permission to stay rather than a visa. It is available to the vast majority of people reading this guide.
- Visa on Arrival (VoA): a paid visa you apply for at the immigration counter, available only to a short list of nationalities. If you are from a Western country this is not applicable. It costs 2,000 THB, is good for 15 days, and can be extended once for a further 7 days. If you’re reading this from Australia, the US, UK, Canada, or most of Europe, this category doesn’t apply to you: you’re getting the free exemption instead.
- Tourist eVisa (SETV/METV): a visa you apply and pay for online before you fly, through the official government portal. It’s the only route to a genuine 60-day stay from day one.
The 30-day baseline, and who gets something different
As of 15 September 2026, the standard visa exemption for the roughly 60 “waiver” nationalities (Australia, the US, UK, Canada, most of the EU, and similar) was cut from 60 days to 30 days. That’s the single biggest change in this guide, and it’s the one that trips people up, since so much old content online still quotes 60 days. For a complete list of countries, see Thailand Visa Exemption Cut From 60 Back to 30 Days.
A handful of nationalities sit outside that baseline:
| Stay length | Who it applies to |
|---|---|
| 90 days | Argentina, Brazil, Chile, Peru, South Korea |
| 30 days | The general waiver bloc (Australia, UK, US, Canada, EU/EEA, etc.) plus separate bilateral arrangements with China, Hong Kong, Laos, Malaysia, Vietnam, and others. India is now included. |
| 15 days | Seychelles, Mauritius (tourism only, and land-border entries under these arrangements are generally capped at twice per calendar year) |
| 14 days | Cambodia, Myanmar |
If you’re arriving by air, the land-border frequency caps don’t apply to you. Those are aimed at people doing repeated overland visa runs, which is exactly the pattern Section 4 covers.
The Decision Tree
Trip under 30 days: Take the free exemption. There’s no reason to pay for anything else.
Trip 30 to 60 days: This is where you need to do some arithmetic. Your two options:
- Land on the free 30-day exemption, then extend once at a local immigration office (Jomtien, if you’re in Pattaya; see Section 6) for 1,900 THB and roughly half a day of your trip spent sitting in a waiting room. Total continuous stay: 60 days. This is not recommended for two reasons: a requirement of the scheme is the possession of an exit booking, and the hassle of getting an extension is not worth it.
- Apply online for a 60-day Single Entry Tourist Visa (SETV) before you fly, via
thaievisa.go.th. Costs around 2,000 THB, takes a few business days to process, and you walk in already covered for 60 days.
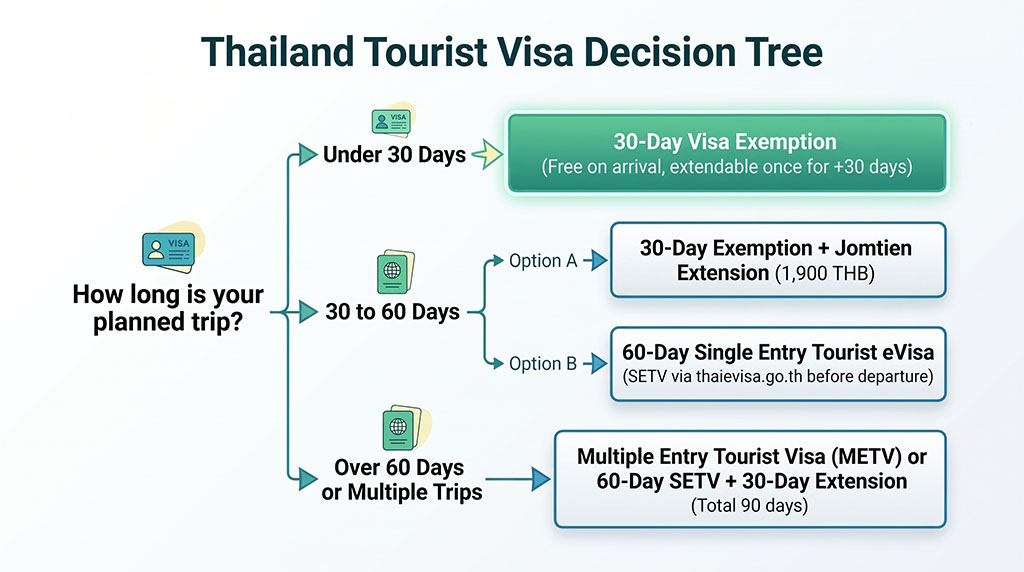
For most people staying 45+ days, the SETV is the better deal: you’re paying roughly the same money either way, but you get your 60 days confirmed before you leave home instead of gambling half a travel day at Jomtien.
Trip over 60 days, or multiple entries over several months: Two paths:
- Extend your SETV by a further 30 days at a Thai immigration office, taking you to 90 days total on a single entry.
- Apply for a Multiple Entry Tourist Visa (METV) instead. It’s valid for six months from issue, allows unlimited entries of up to 60 days each, and costs around 5,000 THB. Be aware that the financial threshold is significantly higher than a standard tourist visa: you must show a maintained balance of at least 200,000 THB (around £5,000 / $6,000 USD / $9,000 AUD) consistently across the past six months. Check the exact local currency figure on the official eVisa portal well ahead of time, as you cannot simply deposit a lump sum right before applying.
2. Before you fly: TDAC and retiring the paper TM6
The blue-and-white TM6 arrival card (the one every visitor has filled out on the plane at some point) is gone. It’s been replaced entirely by the TDAC, the Thailand Digital Arrival Card, a mandatory online form that now covers arrivals by air, land, and sea.
Every non-Thai national entering the country needs to file a TDAC, except air passengers in direct international transit who never clear immigration control. If you’re an ordinary tourist arriving in Thailand, you must submit one.
Submit it within the 3 days before you arrive, including the day you arrive. There’s no benefit to filing early: do it the day before you fly, or while you are waiting to board your flight. There is no fee to lodge the TDAC.
Confirmation is generated within a few minutes of submission, emailed to the address you registered, and always downloadable again from the TDAC status page if you lose the email. Save it as a PDF or screenshot and keep it accessible on your phone. You may be asked to show it at check-in with your airline, and you’ll want it on hand at the immigration counter too, even though officers can usually pull it up on their own system. I have never been asked to show mine.
One important warning: the TDAC is completely free through the official government portal at tdac.immigration.go.th. Fake third-party sites charging US$10 or more for “processing” have already been flagged by Thai authorities, so don’t use anything that asks for payment to file a TDAC. If you land without one and can’t complete it in advance, you can do it at terminals in the immigration area at Suvarnabhumi, but that’s the slow way. Sort it out on your phone before you leave the departure lounge.
Apply for your TDAC here.
3. Clearing immigration: staffed desks vs. Suvarnabhumi e-gates
Clearing immigration is much the same as at any other airport. However, I’ve included some useful information because I know you will be coming back after your first trip. It will also clear up some potential confusion on arrival.
Suvarnabhumi has officially expanded its automated biometric arrival gates to 33 nationalities, up from just Singapore and Hong Kong. If you’re holding a passport from one of the approved countries, you can skip the manual immigration queue altogether.
Eligible nationalities (33): Australia, the UK, Canada, New Zealand, Ireland, Japan, South Korea, Malaysia, the UAE, Singapore, Hong Kong and most of Western and Central Europe, including Austria, Belgium, the Czech Republic, Denmark, Finland, France, Germany, Greece, Hungary, Italy, Latvia, Luxembourg, Malta, the Netherlands, Norway, Poland, Portugal, Slovakia, Slovenia, Spain, Sweden and Switzerland.
Notable exclusions: the US isn’t on the list. American passport holders, along with travellers from China, India and Russia, still have to join the queue for a staffed counter.
Three golden rules for using the e-gates:
- Returning visitors only. You can only use the auto gates if your biometric profile, fingerprints and facial scan, is already stored in the Thai Immigration database from a prior trip. First-timers (or those with new passports) must clear a staffed counter on arrival to register.
- Standard 30-day exemptions only. The automated lanes are built for visa-free tourist entries. If you’re arriving on a pre-arranged visa, a 60-day SETV, METV, DTV or Non-Immigrant visa, go to a staffed desk so an officer can validate and activate it properly.
- Keep the entry slip. The gate spits out a paper entry slip instead of stamping your passport. Tuck it somewhere safe inside your passport. You’ll need it for hotel check-ins and any local visa extension.
On departure, it’s a different story and hasn’t changed: every nationality holding a biometric passport has been able to use the departure e-gates at Suvarnabhumi since late 2023.
4. The 20,000 baht cash rule: law vs. reality
This is the rule that generates the most anxious forum posts, and also the most misinformation, so it’s worth separating what the law says from what happens at the counter.
Thailand has had a proof-of-funds requirement on the books since 1980. The figure that’s actually quoted and applied, regardless of how you’re entering, is 20,000 THB per person or 40,000 THB per family:
| Entry type | Per person | Per family |
|---|---|---|
| All entry types (exemption, VoA, tourist visa, non-immigrant) | 20,000 THB | 40,000 THB |
Physical currency (Thai Baht or major foreign currency equivalent) on your person only. Digital bank balances and ATM cards are not accepted at the inspection desk.
You may come across sources splitting this into a lower 10,000 THB tier for visa-exempt and Visa on Arrival entries specifically. That breakdown traces back to a single Tourism Authority of Thailand release, but it doesn’t match the standard messaging travellers actually get, and it isn’t what’s applied at the counter in practice. Plan on 20,000 THB per person, and you won’t be caught out either way.
Genuine first-time holidaymakers are almost never asked to produce this at the counter. I’ve flown in and out of Thailand more times than I can easily count and have never been asked for proof of funds. What’s changed in 2026 is enforcement intent, not the letter of the law: immigration is now using this statutory clause as a clean, legally airtight reason to knock back people they’ve already decided they don’t want in the country, rather than arguing about it.
Under the current “No Entry, No Stay, No Escape” enforcement push, officers now review your entire passport stamp history at the counter, not just the entry in front of them. Reported figures put refusals in the tens of thousands over recent months, with reasons cited including insufficient funds, no clear onward itinerary, or a visible visa-run pattern: back-to-back 30-, 60-, or 90-day stays with barely a gap between them. If your passport reads like you’re semi-permanently resident on a string of tourist entries, an officer has full discretion to deny you at the border, and “you didn’t have the funds on you” is the cleanest possible paperwork trail for that decision.
If you’re a standard holidaymaker on a routine trip, don’t lose sleep over this. But still carry the cash equivalent (around £500, $600 USD, or $900 AUD) in your pocket, especially at land borders where enforcement is noticeably tighter. Pattaya has many places to exchange money at a much better rate than at home.
Do not rely on showing a banking app, an online balance, or a credit card on your phone. Multiple travellers have reported that officers refuse to look at digital screens, and they will not let you leave the immigration counter to find an ATM. The statutory requirement demands physical currency on your person right then and there. It costs nothing to carry, can be in any major currency, and strips away the easiest technical pretext an officer has to turn you back.
Just keep in mind: if your passport history reads like you’re living in the country on back-to-back tourist entries, that is the actual profile being targeted—and a stack of banknotes in your wallet won’t cure a suspicious travel pattern.
5. Applying for the 60-day tourist eVisa online
If Section 1’s decision tree pointed you toward the SETV or METV, here’s how the application actually works.
Use the official portal only: thaievisa.go.th. That’s the single legitimate channel besides applying in person at a Thai embassy or consulate. There’s a whole ecosystem of unofficial “visa agent” websites that will happily take a markup on top of the government fee to submit the same form you can submit yourself in twenty minutes. Some are fine, plenty are scams charging for nothing you couldn’t do directly. If a site isn’t the .go.th government domain or an actual embassy, treat it with suspicion.
What you’ll need:
- Passport bio page: Crisp, clear scan with at least 6 months of validity remaining from your travel dates.
- Passport-style photo: Taken within the last 6 months (white background, no hats/glasses).
- Proof of current location: A mandatory upload proving you are outside Thailand and in the jurisdiction of the embassy processing the application. A driver’s licence, utility bill, or bank statement showing your residential address works if applying from home; an entry stamp or hotel receipt is required if applying while visiting a third country.
- Proof of onward travel: A confirmed flight ticket out of Thailand within the initial 60-day window.
- Proof of accommodation: Hotel bookings, rental confirmations, or an invitation letter covering at least your initial stay.
- Evidence of funds: A recent bank statement showing a balance of at least 20,000 THB per person (or 40,000 THB for families). For the Multiple Entry Tourist Visa (METV), this jumps to 200,000 THB maintained consistently across the preceding 6 months.
Single Entry Tourist Visa (SETV): 60 days on entry, extendable once by a further 30 days at any Thai immigration office, for a maximum continuous stay of 90 days. The fee is the equivalent of around 1,000 THB.
Multiple Entry Tourist Visa (METV): Valid for 6 months from issue date, with each individual entry good for up to 60 days. You can cross in and out repeatedly within that 6-month window. Fee is around 5,000 THB, and expect the funds-evidence bar to be set higher than the SETV given the extended validity.
Processing generally runs a handful of business days through the official portal. Apply with enough runway before your flight that a document query or resubmission doesn’t put your travel dates at risk, but don’t expect it to take weeks if your paperwork is in order.
When applying, ensure that all details are correct. Incorrect information can lead to a refusal. If this occurs, you will need to reapply and pay a second fee.
6. Extending in Pattaya: the Jomtien immigration routine
If you’re based in Pattaya and going the “land on the exemption, extend locally” route, Jomtien is your office.
Where: Chonburi Immigration, Jomtien, at 75/265 Moo 12, Soi 5, Jomtien Beach Road, Nong Prue, Bang Lamung, Chonburi 20150.
Hours: Monday to Friday, 08:30 to 12:00 and 13:00 to 16:30. Closed for lunch, weekends, and public holidays, so don’t turn up at 12:15 expecting service.
What to bring:
- Your passport, plus photocopies of the bio page, your current entry stamp, and your visa/exemption stamp
- A completed TM7 form (available on-site or downloadable in advance)
- TM30 Notification Receipt: A paper slip or printed confirmation from your hotel or condo host confirming your address has been registered with immigration.
- One recent passport photo, 4×6 cm, white background, taken within the last 6 months.
- 1,900 THB in cash: a government fee, and cash only
- Proof of accommodation for the extension period
- A printout or screenshot of your TDAC confirmation and departure card details, since staff will often want to see your entry paperwork alongside the extension request
There’s no booking app for this bit. It’s a walk-in, in-person process: head to the first building on the left as you enter the compound and find the correct queue for extensions. Staff there check your documents, hand you a TM7 form to fill out if you haven’t already got one completed, and give you a queue number. From there, head to the building at the rear of the compound and wait for your number to be called; that’s where the extension gets processed. Arriving close to opening at 08:30 is still the best way to keep the wait manageable, since the queue builds as the morning goes on.
7. Overstaying: fines, bans, and why it’s never worth it
In case you are tempted to overstay, here are the consequences for doing so.
The fine is a flat 500 THB per day of overstay, capped at 20,000 THB, a ceiling you reach at around 40 days over. There’s no guaranteed grace period. Officers occasionally waive the fee for an overstay of a few hours if you explain yourself at the counter, but that’s discretion, not policy, and you shouldn’t plan around it.
The bigger risk is the re-entry ban, and it depends entirely on whether you leave on your own or get caught first.
If you report to immigration and leave voluntarily, the ban escalates with how long you overstayed. Under 90 days gets you off with the fine and no ban at all. Push past 90 days and you’re looking at a 1-year ban, rising to 3 years for an overstay of 1 to 3 years, 5 years for 3 to 5 years, and 10 years if you’ve overstayed more than 5 years.
If immigration catches you before you leave, the same overstay carries a far harsher ban regardless of the exact length: 5 years for anything under a year overstayed, and 10 years for anything over a year. There’s no gentler tier for getting caught early.
That gap between the two paths is the whole point: a six-month overstay is a 1-year ban if you turn yourself in at the airport, or a 5-year ban if immigration finds you first. Overstaying is also a criminal offence under the Immigration Act, carrying a possible fine or up to two years in prison on top of any ban, though in practice tourists who pay up and leave rarely see it go that far.
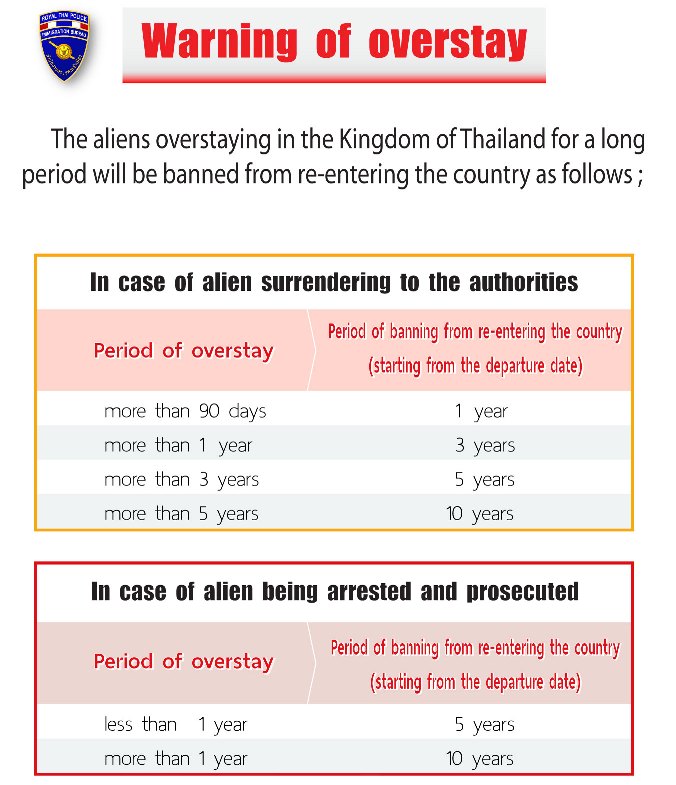
Don’t overstay. If you’re going to, even by a day, settle it and leave under your own steam rather than waiting to be picked up. That decision alone is the difference between a fine and a multi-year ban.
8. Quick checklist: what must be in your carry-on
- Passport valid at least 6 months beyond your intended stay
- TDAC confirmation, downloaded as a PDF or screenshot, accessible on your phone without needing wifi
- Proof of onward or return travel: a booked ticket, not just an intention
- Cash: Thai baht or equivalent, 20,000 THB per person (40,000 THB per family), even if you never expect to be asked
- Proof of accommodation for at least your first few nights
- A spare passport photo (4×6 cm, white background) if there’s any chance you’ll be extending locally later in the trip
- Photocopies of your passport bio page, useful for immigration offices, hotel check-ins, and SIM card purchases alike
Get these sorted before you board, and clearing immigration in Thailand in 2026 is a five-to-fifteen-minute formality rather than the guessing game it’s become for people working off outdated information.